
Reviewing construction documents for quality is a well-oiled process at Henderson Engineers given our five-plus decades of industry experience. However, our approach to reviewing Building Information Modeling (BIM) for quality initially required a different mindset, toolset, and skillset than we were accustomed to.
In one of my previous articles, I explained how we approach BIM with a quality mindset. With the reasoning laid out, let’s move on to our process. Henderson utilizes a robust suite of tools to ensure high quality design and BIM. The “right tool for the right job” is a persistent focus of ours, so the tools we use are targeted to specific audiences. Therefore, our selection of the right tool depends on several factors including the friendliness of the user interface (UI), the availability of training material, licensing, file size, security, support, troubleshooting, etc.
Below are three highlights from the tools we use:
We utilize QC views in addition to plot views and design views, which aredifferent lenses for analyzing design models. Both our designs and modeling are scrutinized by their respective project manager, designer, or reviewer.
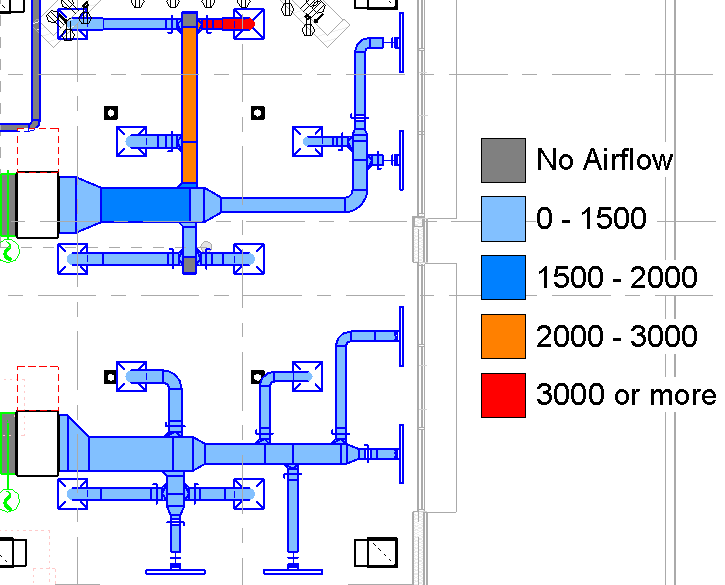
These lenses are used to highlight certain aspects to indicate potential issues from a design standpoint in the plan view or reflected ceiling plan format. Instead of only looking at separate sheets with the building split up, the views are intended to be a whole level system view that isn’t printed on a physical sheet. This allows us to see the entire floor plate of the level at once and review the systems holistically.
A great example of a view is a duct velocity plan. The designer can quickly review design calculations with a color fill and legend instead of reading tags or manually backchecking. In addition to determining whether the duct is sized correctly, the view checks that the integrity of the modeled system is correct and highlights unconnected elements. This is crucial since it would be easy to have the plan look correct despite the BIM system being incorrect. This allows the designer to be proactive about fixing items before the project is submitted to our internal review process, thus saving time.
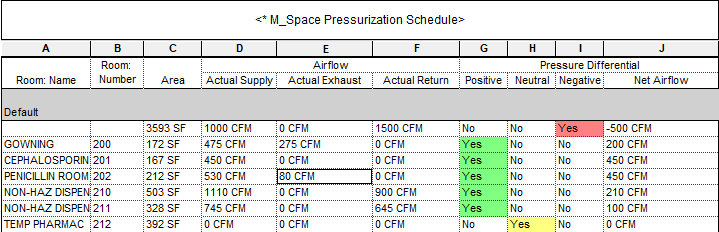
The intent behind QC schedules is similar to that of QC views. In addition to design and plot schedules, the QC schedules present data in a particular way. Instead of highlighting the data in a view, we can highlight elements using conditional formatting. The designer can change values from the schedule or use the “view in model” button for a closer look.
Examples of QC schedules include an electrical circuit schedule used to highlight orphaned circuits or a space schedule to clean up unplaced spaces. One of my favorites is shown below. Since the pressurization of spaces is vital in our healthcare practice, such a schedule helps us quickly check that the air is headed in the right direction for critical spaces.
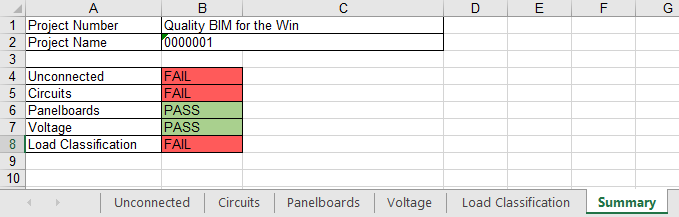
QC reports are technically a schedule that simply follows a different approach and has a different audience. These reports are intended for the final reviewer and function as a Dynamo script that pulls engineering settings out of the Revit application, checks them against a standard, and then inputs the result into an easy-to-read Microsoft Excel file.
For example, pipe systems settings are used in pressure drop and velocity calculations, which can be viewed through the QC views. The underlying calculation settings of each discipline could easily be overlooked as a given, but we don’t take quality for granted. It’s crucial to check that the definitions of the pipe settings are correct to begin with. Our design standards and building codes are there for this reason and checking results in a pass or fail, bringing special focus to an area of the project that is outside of our norm if needed. The effect on the project is that the special project condition is reviewed along with the rest of the design.
Below is an example of an electrical check. In this instance, the designer might have made a design decision and modified the demand factor definition for an exception to the NEC.
The methods above are relatively quick and painless. They are aimed at aiding our experts in their existing processes, but not replacing them. Our overall intent is to highlight items that could bring risk into a project and we use the framework outlined above to assist with checking design, modeling, and data requirements. We believe in doing everything we can do to minimize risk so clients can always expect quality deliverables.
Stay tuned for another article on how we approach clash detection versus clash avoidance.

Jared Carlson, engineering director, will be presenting Navigating Change when Introducing New Tools and Processes to Maintain Buy-In and Insure Adoption at the Advancing Design Quality Management Summit. He’s excited to dive into the innovative ...
Read More
Starting May 13th Mark Chrisman and Laura Longoria will be in Orlando for BOMA International’s Medical Real Estate Conference. Team Henderson is excited to explore healthcare real estate from every angle and lean into what ...
Read MoreJoin our email list to get the latest design innovations, technical content, new projects, and research from Henderson’s experts delivered straight to your inbox.